When the plaining was done i joined the 2 pieces together and left them in a cramp overnight. I repeated this step for the front plate. When the plate was joined i through the former to get the shape of the plate and cut it out on the ban saw. and did the same for the front plate.
Monday, December 8, 2008
Front and back plates
We were giving 2 pieces of wood for our back and we had to plain them up on the plainer getting them to a required thickness and to give a straight edge for them to join up.
Moving on
After the sides were joined i started to put my kerving around the sides of the bent sides.
I know started to make my braces by using the templates and Drawings as guides. its a long process because there is so many braces to make for both plates.
Tuesday, October 28, 2008
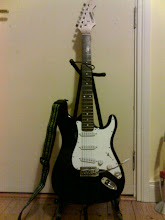
Metalwork
Today we started our metalwork module in the main campus. We started off by making a press handle.
In the metalwork module we have to make a guitar stand. We started by cutting a piece of metal at a angle of 30 degrees and 300-mm long. I then drilled two holes in the bars. I then had to get an angle of 58 degrees so that the guitar stand is at an angle. I placed it in a jig to make sure it was correctly fitting.
Joining the sides together
Today i stuck the sides to my guitar by joining each side to the the neck and tail block. It took a lot of tweaking and final bending to get this all straight and lined up. i had to plain off any high bit s on the sides using the block plain.
As soon as the sides were joined and the glue was dry i added the kerving to one of the sides which were already cut. I put the kerving the whole round the sides and held them in place using pegs with elastic bands for extra strength.
Friday, October 10, 2008
3rd Stage
Tail Block, Neck Block, Braces and Kerfing
Tail block: I had to sand two corners of one side of the tail block at a angle of 30 degrees and the other was slightly curved, these were both done on the sander.
Neck Block: The neck block just like the tail block had one side at 30 degrees and a curved side. The neck block required a trench to be removed. This is a dovetail joint and the neck joins in here. Using the mortise i removed the trench which is to be the dovetail joint. After this was removed i had use the grinder to have a slant on the sides of the joint. this was done using a specially designed jig.
Braces: For the back plate i needed to make four braces which give the back its durability. I had to create four different ones using the plans and chisel and scaper. It took a long time but it's worth because of the importance of the braces. Each brace is slightly curved at the bottom to give the curved back of the guitar.
Kerving: The kerfing is flexible strips of wood that join onto the sides of the guitar and provide a bond between the plates and sides. They were created by getting a strip of wood that was cut at slant. Using the chop saw i cut continuous slits into the wood 5mm apart and at set depth all the way along the wood. The result was avery flexible strip of wood, i had to cut four lengths of wood.
Bending the sides
For bending the sides i had to use the thickener to cut the wood down to 2.5mm and then i had to run them through the sander to give them a smooth finish.
I then used the template and drew around it and using the ban saw cut as close to the line as i could. I then left the two sides in water for 30 minutes to soak. I turned on the bending iron to heat level 6.
After the 30 minutes i took one piece out started to bent it using my 1st former as the guide.
The process of bending involved Soaking-heating-bending and finally holding till it cooled.
it was a very long and frustrating process required a lot of patience to do right.
2nd Stage
The second stage in making the guitar was to a have a practice in bending the sides.
This involved bringing a length of wood down to 2.5mm using the thickener taking 2mm cuts each time. I then soaked the wood in water to loosen the cellulose fibers. Using the bending iron the heat made the fibers flexible and easy to bend. Using the former as a guide I bent the side.
Internal Former
Using cardboard i cut out two pieces for the front and back plates. I drew around the template and cut them using a knife. I then cut out five pieces of wood and glued them together, this created the internal former.
Subscribe to:
Posts (Atom)